Set Up Print File
Life is so much easier when you know how to properly set up print files. Getting it right the first time means satisfaction on the first try. You should never have to run back and forth between your computer and printer, hoping you chose the right settings; it’s a waste of your time and money.
It’s in your best interest to learn how to format your files. While AlphaGraphics in Rexburg can help you set up a print, it’ll be a handy skill to have when you’re printing off business collateral or other projects in the future. The following are a few pointers you should think about when working on a project you’re expecting to print.
Know The Size You Want & What Format To Use

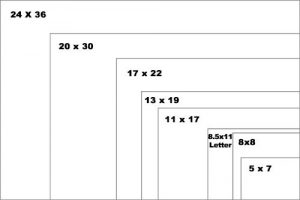
Terms like letter, legal and tabloid are common in the world of printing, but they may be new to you. It’s important to know how big you want your print to be, which can be used as an excellent starting point for setting up your print.
AlphaGraphics offers a huge range of possibilities in our print and
copy services. Between all of our printers, we can produce anything for you from 1 to 120 inches wide.
The formatting of your file is very important, simply because some files don’t translate to printable items. When saving what you want to be printed, we recommend PDF files (Portable Document Format).
Use High-quality Images

This is to make sure you don’t have any pixelated images in your prints; even if everything is formatted perfectly, a pixelated picture can ruin the professional look of a print in an instant. A good rule of thumb is to look for a high resolution of 300 DPI (or dots per inch) when picking your images. If you took pictures with a high-quality digital camera, you’re probably safe to use those in your project depending on the size you want to print it at.
When using a graphic, it’s best to use
vector images. These types of images don’t lower in quality when you resize them, so you can make them as big or small as you want without worrying about what it will do to the image.
Convert Text to Outlines

Text and fonts can be extremely finicky when it comes to getting your files ready for printing. A common problem is not having the same fonts between the computer you worked on and the computer you’re trying to print from. Another one is when the text randomly decides to be a different font or take up more space than it did before for no reason at all.
The amount of different problems text can bring is truly astonishing. Luckily, most, if not all, can be solved by turning your text into outlines. This refers to essentially turning the letters into individual shapes, which can be easily done in any of the Adobe products (especially Illustrator and InDesign). Now that the words are shapes, there’s no need to worry about having the same fonts or that they will go anywhere; outlines are much easier to deal with.
Know Your Colors

There will be times where you print a colorful poster and the colors don’t look quite as good as you were hoping.
“They looked better on the computer monitor,” you might think.
That’s because they probably did. Monitors show colors using the RGB color model, which supports a wider color spectrum, while printers use the CMYK model. Generally speaking (though equipment does play a huge role here), CMYK matches 85-90 percent of RGB colors. You’ll have the most trouble trying to match neon and other bright colors with CMYK printing.
AlphaGraphics in Rexburg, ID offers to print a proof for you to see if the colors are what you wanted. If they aren’t, you have a chance to tweak the colors before printing 40 copies of your wrong-colored project. Let us help you get the colors perfect for your projects. Come in and talk to one of our printing experts to get a proof printed off today.